
|
|

|
|
|
|
Welcome to the Australian Ford Forums forum. You are currently viewing our boards as a guest which gives you limited access to view most discussions and inserts advertising. By joining our free community you will have access to post topics, communicate privately with other members, respond to polls, upload content and access many other special features without post based advertising banners. Registration is simple and absolutely free so please, join our community today! If you have any problems with the registration process or your account login, please contact us. Please Note: All new registrations go through a manual approval queue to keep spammers out. This is checked twice each day so there will be a delay before your registration is activated. |
|
|||||||
 |
|
|
Thread Tools | Display Modes |
 04-05-2011, 11:30 PM
|
#1 | ||
|
Regular Member

Join Date: Nov 2009
Posts: 57
|
Don't you hate it when winter swings round (far too quickly for some of us), and all of a sudden, the days are getting wetter and wetter.
I hate it more when I find large puddles of water in the floor pans of my treasured escort, characteristic of the gorgeous beasts. But where the fudge is this water coming from! It is most definately caused by a 'rusted heater bubble' or firewall, or a combination of both (in my case). We'll stay on the heater bubble aspect for the moment. Don't despair, it can be fixed, and heres a way to do it without access to a large array of tools when you're on a fairly tight budget. The drainage system on the ford escort leaves a lot to be desired, with the water from the windscreen spilling into the grill above the hood, which then travels through the heater bubble and out a small hole to drip down the firewall. Leaves and other debris get caught in the heaterbubble providing a barrier for waterflow and a cosy home for that carcinogenic nightmare we know as rust to meet, mate and multiply. Before I carry on, heres a little shopping list/resource list I've compiled: - an angle grinder (or drill and hacksaw blade if you can't access one of these) -chisel/screwdriver and a file of some sort would help - a rust converter of some sort (see picture below for the brand I bought from Auto1) - 1m2 of fibreglass - equivalent resin (From memory around 250gm, its quite a small pot) and small bottle of catalyst (ask your local bunnings man) - some rags - plenty of disposable containers - a few disposable paintbrushes (fibreglassing will ruin these, so don't use grandads horsehair brush) - a healthy amount of patience Lets get started! Heres an example of what your heater bubble might look like at this point of its demise 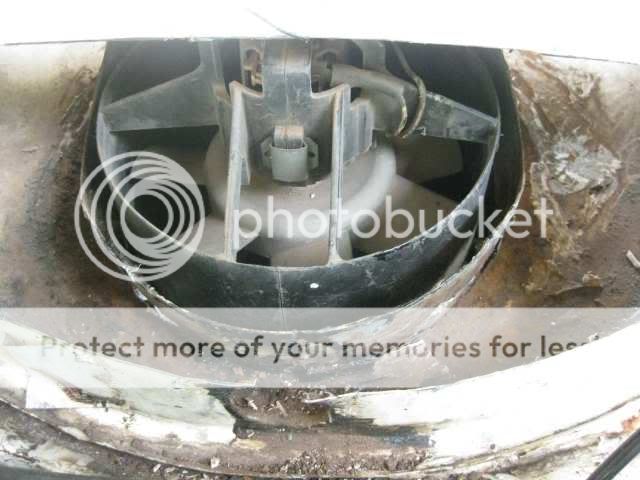 Heres how I went about repairing mine..... Get an angle grinder and cut a rectangle out of your bubble (you cant take the hole bloody thing off if you please) but I've cut a small rectangle at this point as I don't have access to any fabrication facilities as of yet. Alternatively, you could drill/punch a hole and get at it with a hacksaw blade  I then got to work with a screw driver and chisel as well as a rasp file and really roughed up the visible rust. Get all the large pieces out, you don't want any flaky metal left, so give it a real good giv'er. Once all the debris has come out, really file that metal back till its shiny and lustrous, although with most converters, this is not necessary, as the converter neutralises this rust and forms a substrate. 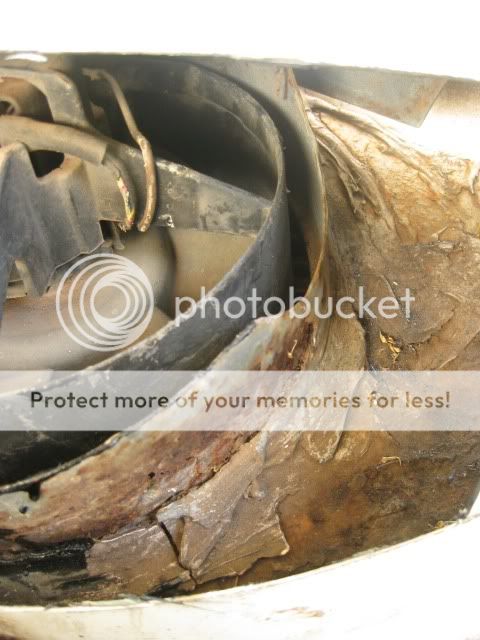 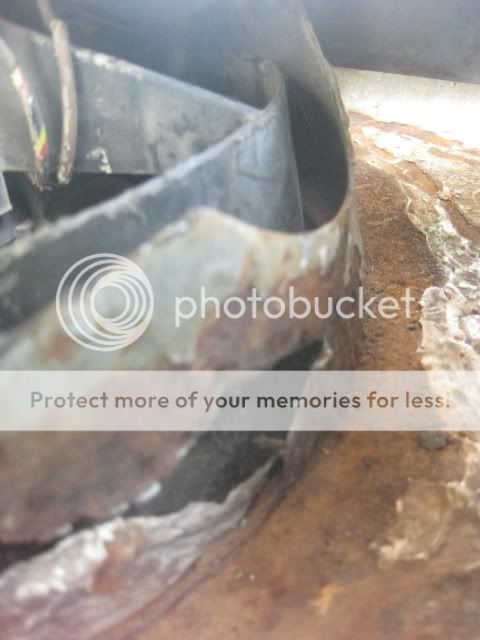 Now get your rust converter and spray a liberal amount on the effected area, I gave it a really good spray in and around anywhere I couldn't get to/see Around the bottom of the bubble 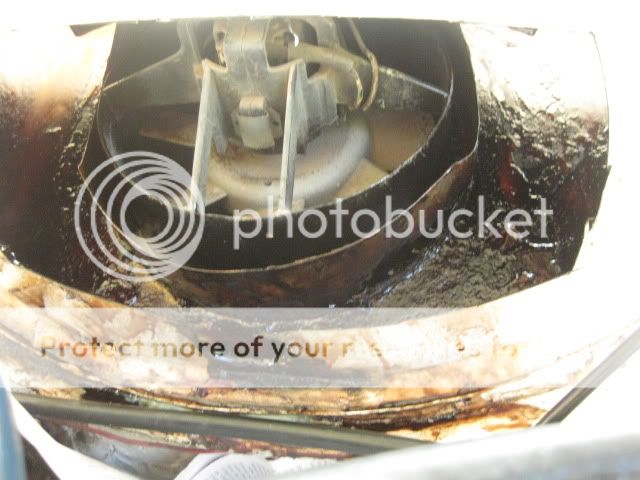 Up under the grill (make sure you file/sand back any paint etc.) 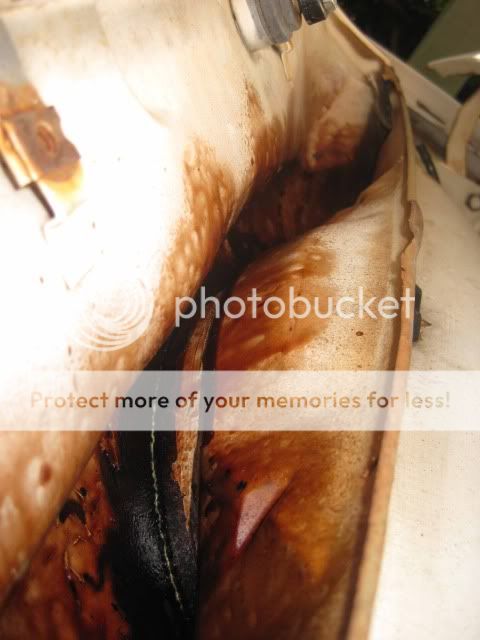 My rust converter 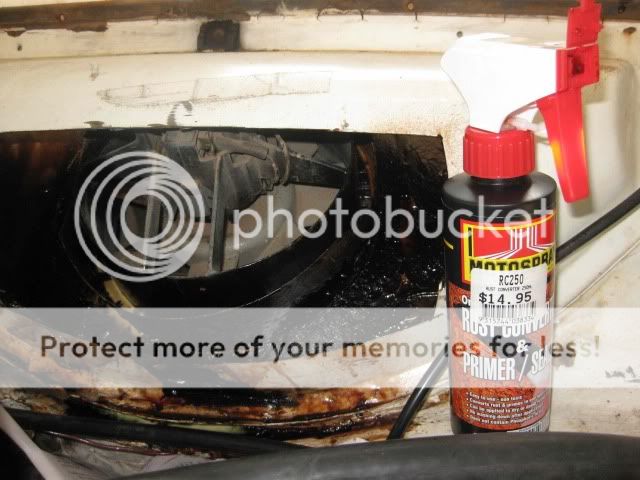 Let this dry as per the instructions on the rust converter bottle - don't worry, it won't look like the horrible orange, it turns black (mine did anyway!) Now comes the part for patience - fibreglassing. I believe fibreglassing is 90% preparation, 10% application, so I like to get everything ready before that catalyst hits the resin, because thats when the clock starts ticking. Firstly, I cut out strips of the fibreglass sheet and lay them just as I would when the resin hits them. I like to allow for a liberal amount of overlap to really create a bond. Its also handy to have little peices cut and ready to fill in any gaps occurring when you are glassing, this will give you more time with the resin, instead of cutting away while that resin dries. Once you have a plan of attack for your fibreglassing, make sure the surface is free from dust and any debris, and mix your resin. I reckon 100ml with, i think 25 drops of catalyst did a layer of glassing on this, better to be under than over, you can always mix more, whereas leftovers are only good as pretty ugly paperweights. Apply a generous amount of resin to the surface of where you're about to glass, then kind of smoosh in the pre cut sheets in their positions creating whatever overlaps you chose. Then get the brush and really dunk it in the resin, and give it a firm dab on the fibre sheets, you know you're getting a nice bond when the fibres go from that flaky white to a nice gooey clear colour. Don't try brushing the glass to much, it will most probably tear and deform leaving holes and inconsistencies. Instead, I like to use the dabbing technique. I would like to note right here that fibreglassing isn't something you pick up the first time you do it, I'm still no pro but this is the technique I use, and one which I find most efficient. Another thing - don't stress, go with the flow, remember, you can always patch over it, and this isn't a part of your car requiring a cosmetic grade. Heres how mine turned out - this is after maybe 2 - 3 coats of glass from memory... 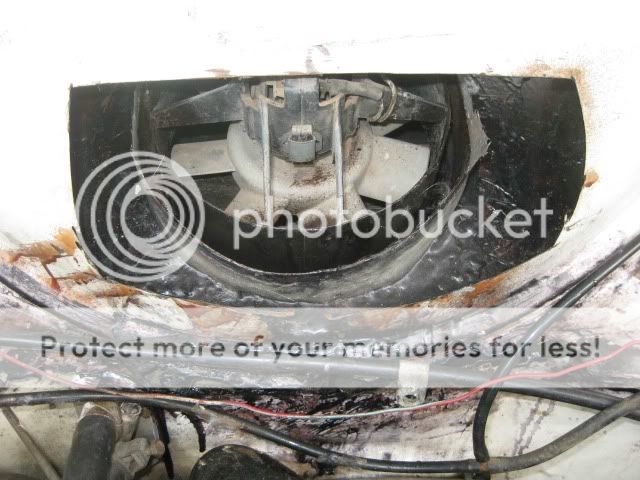 The walls around the heater fan 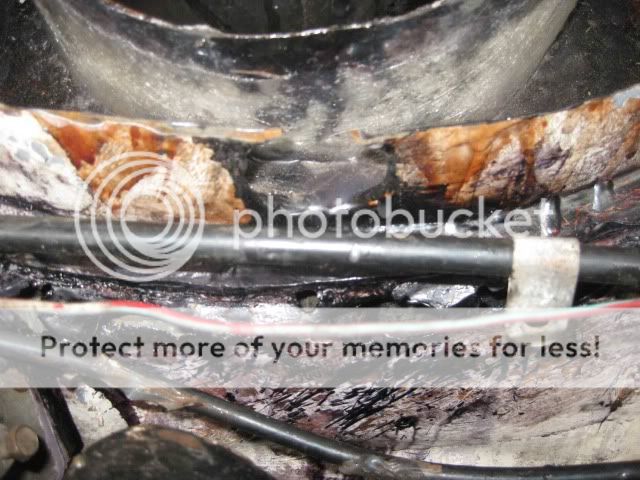 Keep glassing until you're positive theres not holes, then, after 24 hours, get a hose on your windscreen (on spray to simulate rain) and get in your car for the moment of truth! Don't despair if you're still getting wet floor pans, and don't let that give you cold feet - my victory still hasn't come after a year of discovering this problem, but its definately improved, and I just slowly work away at it. If its stopped leaking - you've solved the problem, well done, but remember, stay vigilant and clean out that bubble throughout the year to remove debris (you might want to keep that rectangle cutting out as an inspection point). If it hasn't stopped leaking, its possible the rust has formed in other areas, which was the answer in my case, with the whole firewall being pretty rusty!!! This gives you a vague idea 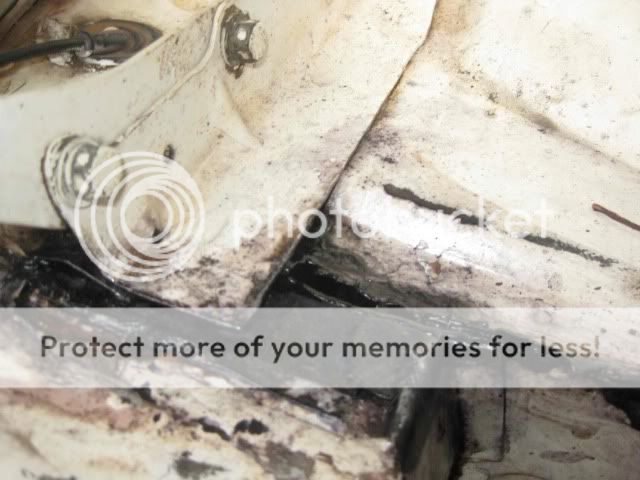 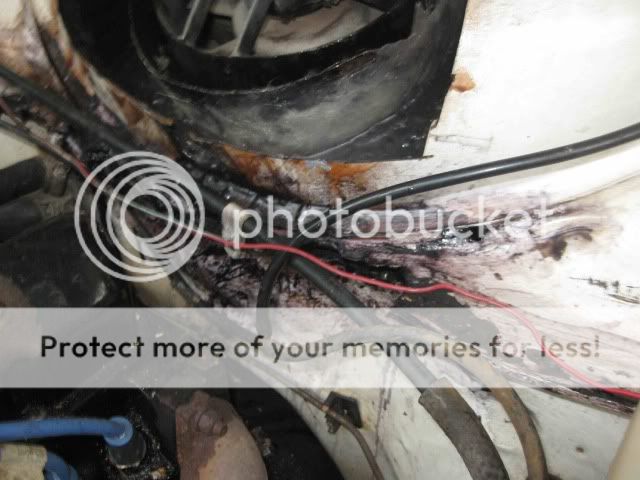 But don't worry - this should keep you busy until I post the next how to on the firewall problem! Stay positive, stay vigilant! When my escort frustrates me like this, I just see it as another learning curve and remember that it is always adding to your knowledge! I hope this is clear - any other questions don't hesitate to ask/PM me.
__________________
Regards, Tim ------------------------------ 1978 Ford Escort Panelvan |
||

|

|
|
05-05-2011, 01:22 AM
|
#2 | ||
|
FF.Com.Au Hardcore
Join Date: Jul 2009
Posts: 3,394
|
Thanks for your very informative post, im sure ill be able to use your tips on my Escort one day.
|
||
|
|
|
|
05-05-2011, 04:27 PM
|
#3 | ||
|
Regular Member
Join Date: Feb 2007
Posts: 82
|
Thanks for the info, mate. Legendary post that shows just how bad things can get on this notorious spot. I've got the same problem at the moment, but I still don't know how bad it is yet, but I'm bracing myself to be slugged for a couple thou. But honestly- what a crap design for the function it performs! I understand there's a similar "what were they thinking" feature in the c-pillar below the vents; apparently there's a bowled section that does little more than collect rainwater? I can already see small bubbles popping up through the paintwork, & I know the day's coming when it's going to have to come off the road for a full strip- down. If I didn't love the little thing so much...
|
||
|
|
|
|
05-05-2011, 10:03 PM
|
#4 | ||
|
Regular Member
Join Date: Nov 2009
Posts: 57
|
Thanks mate. I went into a lot of depth because this is the post that I was searching far and wide for when I encountered this problem...
This is definately a job you can do while its on the road (probably more likely in summer) so you can at least neutralise the rust and get the ball rolling. I'm not sure what you mean about the c pillar - I'm assuming thats drainage for the back window on a sedan/coupe, I'm sorry to hear about that (but i have a panelvan so haven't encountered this prob).... But - in saying that, theres still a lot of problem areas i.e. sills in barn doors and also interior sill above the rear panel windows where the headlining would sit. Best of luck with your project - its always worth it!
__________________
Regards, Tim ------------------------------ 1978 Ford Escort Panelvan |
||
|
|
|
|
06-05-2011, 12:42 PM
|
#5 | ||
|
Rally Nut

Join Date: Feb 2009
Location: Melbourne
Posts: 297
|
The best thing to do with the C pillars is full weld in plates to block them off! nearly a standard fix these days. I just put the vents back over the filled in panel
I have unpicked the heater bubble on all my escorts to do the rust repair, replacing the metal & the ring, I agree WTF were they thinking on the design of that! but means the bubble stay fairly intacked When I can get onto the Classicford forum I will post the link to PeterM's RS rebuild which shows one of the best fixes for the heater bubble |
||
|
|
|
|
06-05-2011, 02:19 PM
|
#6 | ||
|
Regular Member
Join Date: Feb 2007
Posts: 82
|
I'm just repeating something I've heard, but I thought the vents were there because it was found (when they were new, and therefore relatively airtight) that when a door was slammed, the compression of air inside the cabin could pop the rear window out? So the vents were designed to allow a small release of air to prevent this from happening? May be all B.S., as from what you've said it doesn't seem to have affected your Eskies adversely. It's a good idea though, when I get to that section of my car I'll definitely look at getting that done.
Another fix I heard today from a panelbeater who's going to tend to my heater bubble rust is: drill out the spot welds on the heater bubble using the smallest drill bit possible to get it off, fix up the rust, then use sheet metal screws fitted with rubber seals to reattach the heater bubble. So whenever you want to pop the heater bubble off, you can just unscrew and clean it, then screw it back on. It sounds like a bloody good idea, & this particular bloke who is (or was, in his younger days) an Escort enthusiast said he'd done this modification before. It certainly removes the difficulty in accessing a notorious blind spot prone to rust. I'll let you know how it all goes in about 3 weeks, once they've had a go at fixing it up. |
||
|
|
|
|
06-05-2011, 08:00 PM
|
#7 | ||
|
Regular Member

Join Date: Mar 2011
Posts: 121
|
[Another fix I heard today from a panelbeater who's going to tend to my heater bubble rust is: drill out the spot welds on the heater bubble using the smallest drill bit possible to get it off, fix up the rust, then use sheet metal screws fitted with rubber seals to reattach the heater bubble. So whenever you want to pop the heater bubble off, you can just unscrew and clean it, then screw it back on. It sounds like a bloody good idea, & this particular bloke who is (or was, in his younger days) an Escort enthusiast said he'd done this modification before. It certainly removes the difficulty in accessing a notorious blind spot prone to rust. I'll let you know how it all goes in about 3 weeks, once they've had a go at fixing it up.[/quote]
Sounds like a plan, as cutting out a section in the bubble then means welding back in a section, as to drilling out the bubble can you post what size drill is advised to drill out spot welds, it is a job I need to do on my RS before it hits the road, I also have the C pillar and boot wells. Muzzy |
||
|
|
|
|
24-05-2011, 12:24 PM
|
#8 | ||
|
Regular Member

Join Date: Jul 2008
Posts: 129
|
You can buy replacement bubbles made from fibreglass, just remove the old one and glue the new one in place.
|
||
|
|
|
|
24-05-2011, 05:47 PM
|
#9 | ||
|
Pommy Ford tragic

Join Date: Sep 2007
Location: Crescent Head
Posts: 26
|
Great post, something all of us Escort owners will (sadly) most likely face at some point. After repairing the tin worm underneath, the fibreglass bubbles do seem like a good solution.
__________________
I got nuthin. |
||
|
|
|
|
29-05-2011, 12:02 AM
|
#10 | ||
|
Regular Member
Join Date: Nov 2009
Posts: 57
|
Hey muzzy can you post some pictures of that solution? because that sounds like a great way of getting around re-sealing that heater bubble. cheers mate
__________________
Regards, Tim ------------------------------ 1978 Ford Escort Panelvan |
||
|
|
|
|
06-06-2011, 02:58 PM
|
#11 | ||
|
Regular Member
Join Date: Feb 2007
Posts: 82
|
Hi All,
Sorry to disappoint with my promises of getting the heater bubble drilled out & reattached using sheet screws & o-rings. That is what was supposed to happen; as it turns out, the rust repairer reckons it didn't need to happen. I can possibly post a few pics of the rust problems I had with mine, but as it doesn't really serve to enlighten I probably won't bother. Basically, they ground back & patched up the rust that was sitting outside the heater bubble on the fusebox side, patched up the rust on the inside of the bubble "seam" with some sort of silicon, & resealed the seam where the bubble sits on the bulkhead, then resprayed. The way they put it, it was a $450 fix instead of pushing it well over a grand. The upshot of it all is that it doesn't leak water anymore, it looks quite good, and the only thing they didn't bloody well put on was the little rubber flap over the drain hole at the bottom of the bubble. Which means I have to replace & fit it myself, otherwise I'll end up getting cold rainwater pouring onto hot engine block. I am a bit annoyed that (in my view) the whole root of the problem wasn't tackled, but my hip pocket is thanking me that their fix seems to have worked. I guess it's something that will come up when I take her off the road for a full rebuild, but at least the car's watertight enough to keep on driving for a little while yet. -Dan |
||
|
|
|
|
10-06-2011, 06:26 PM
|
#12 | ||
|
Regular Member
Join Date: Mar 2011
Posts: 121
|
I started mine today, using a special spot weld drill bit I have drill out all the spots and lifted it up , it wont come free of the grill/vent even after drilling out the spots, I'm thinking solder seal between the panels, anyway a bit more progress.
__________________
RS2000 5 speed Twin 44idf webers + other goodies 
|
||
|
|
|


 Linear Mode
