
|
|

|
|
|
|
Welcome to the Australian Ford Forums forum. You are currently viewing our boards as a guest which gives you limited access to view most discussions and inserts advertising. By joining our free community you will have access to post topics, communicate privately with other members, respond to polls, upload content and access many other special features without post based advertising banners. Registration is simple and absolutely free so please, join our community today! If you have any problems with the registration process or your account login, please contact us. Please Note: All new registrations go through a manual approval queue to keep spammers out. This is checked twice each day so there will be a delay before your registration is activated. |
|
|||||||
 |
|
|
Thread Tools | Display Modes |
 29-02-2012, 10:41 PM
|
#1 | ||
|
74xbkoop

Join Date: Mar 2008
Posts: 204
|
Hi All,
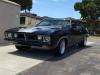
Now that I have sort of finished my toy I thought I might share the ups and downs of the last eight and a half years. My passion all started when I bought my first car a 75 XB fairmont coupe back in 1987. Call me a dumb a@# now but I sold it after about 5 years of great times. It was a very sad day. I got the bug to get another one early 2003. I traced down several for sale but ended up being a day late on each of them, some bastard was just in front of me and bought all of them. I ended up finding this one an hour from home. It looked good (looks can be deceiving) Had been resprayed, looked straight, Fired up fine and a heap of genuine ford NOS parts. This was how it looked then     It was a 74 XB Fairmont, 302, Top loader, Borg warner, Pepper red, Tan interior. I was in heaven again Back in a coupe. |
||

|

|
|
01-03-2012, 01:40 AM
|
#2 | ||
|
Regular Member

Join Date: Jun 2010
Location: Perth
Posts: 81
|
Don't stop there......carry on

|
||
|
|
|
|
01-03-2012, 08:29 PM
|
#3 | ||
|
74xbkoop
Join Date: Mar 2008
Posts: 204
|
Here is more, There is lots to come but might take a while.
Shortly after getting it back into town I found a shed to rent and started to see what work needed doing to the car. The more I looked at the more came apparent that some things didn't look right with the panels that I looked over when I first looked at the car. Even though it didn't look too bad something didnt add up.    My some Jacob was very happy with the car  Then the fun started! Last edited by 74xbkoop; 01-03-2012 at 08:32 PM. Reason: More photos added |
||
|
|
|
|
01-03-2012, 08:31 PM
|
#4 | ||
|
FF.Com.Au Hardcore

Join Date: Nov 2011
Location: Southern Highlands
Posts: 1,493
|
The coupe looks good back in the day we need to see more.
|
||
|
|
|
|
01-03-2012, 08:42 PM
|
#5 | ||
|
74xbkoop
Join Date: Mar 2008
Posts: 204
|
After checking it over and getting some advise from some friends I decided it needed too much work to just get it ready for rego and enjoy it. So if im going to do it im going to do it properly.
Started stripping the paint off to see what was underneath and what was hidden.         What a pain in the a@# job that is |
||
|
|
|
|
01-03-2012, 09:03 PM
|
#6 | ||
|
moderator ford coupe club

Join Date: Jun 2007
Posts: 6,640
|
i recognise the young bloke but he looks somehow different - around 8 years older maybe
 you have done well anthony - hope to see more pics soon Last edited by gtxb67; 01-03-2012 at 09:09 PM. |
||
|
|
|
|
01-03-2012, 09:07 PM
|
#7 | ||
|
74xbkoop
Join Date: Mar 2008
Posts: 204
|
Finally got all the paint off and could see the problems it had.
 Left hand side, Door scraped and dented full length. Rust front and rear corners. Guard dented all the way along. Rear quarter rust and scrapped full length.       Right site similar story. Door and guard not quite as bad. Rear quater bottom dented and not lined up.     And best of all   The bog in here was about 3/4 inch thick and this beautiful piece of workmanship was done by a profesional (qualified) repairer years ago and it also had been to another panel beater for respray and still not repaired properly!! I know there are worse cars on here rust wise etc but it peaved me off when I was advised that the car had issues and were all fixed profesionally. As the saying goes " You cant polish a **** but tou can paint it " |
||
|
|
|
|
01-03-2012, 09:17 PM
|
#8 | ||
|
74xbkoop
Join Date: Mar 2008
Posts: 204
|
More pictures of findings.
      Door pilars were still good   Looks like I had to learn how to panel beat and weld! |
||
|
|
|
|
01-03-2012, 09:55 PM
|
#9 | ||
|
74xbkoop
Join Date: Mar 2008
Posts: 204
|
After Finding the problems I got a bit depressed with the whole thing. I ended up undercoating it to help prevent the surface rust. Fitted doors and guards to see how things fitted.
    Drivers side caused some issues, Things just didn't align. Found the rear quater seemed to be stressed and not fitted at the correct angle.  Uneven door gap  The Rh side was "Fatter" than the Lh side   And the door lock Pillar "think they call it the B Pillar was not leaning inwards.  Compared to  Needed to get more advise on how to fix the problems. Not much happened for a while as a couple of "Friends" were going to help with the repair but kept promising and not showing up. I came to the conclusion that if this is going to be fixed I will have to do it myself. I got busy with my business and ended up moving out of a shop and building a shed at home to work from [B]and put the coupe in[B] More to come. |
||
|
|
|
|
01-03-2012, 10:54 PM
|
#10 | ||
|
injection is nice, but...
Join Date: Jul 2007
Location: Camden, N.S.W
Posts: 1,070

|
Going to follow this, your car is absolutley stunning. I had a good look at Echuca last year!
__________________
Proud member of the Clevo Mafia Limetime Green '74 XB Coupe- Classic not Plastic. Blueprint '02 Pursuit 250- Plastic not Classic (yet) Venom '01 AUII Rebel- RIP. Gone to a better place. Winter White '12 FG GT 335 R-Spec - something the wife thrashes daily '05 CRF450X- For getting dirty in the, um, dirt. 
|
||
|
|
|
|
02-03-2012, 01:16 AM
|
#11 | ||
|
Regular Member
Join Date: Aug 2011
Location: Perth WA
Posts: 216
|
[/quote] And best of all
image image The bog in here was about 3/4 inch thick and this beautiful piece of workmanship was done by a profesional (qualified) repairer years ago and it also had been to another panel beater for respray and still not repaired properly!! I know there are worse cars on here rust wise etc but it peaved me off when I was advised that the car had issues and were all fixed profesionally. As the saying goes " You cant polish a **** but tou can paint it "[/quote] I have never seen that on a coupe. I would have also been Peeved off seeing that. Was it just the one side or both? Both may have been a roof change, but if just the one side, must have been in an accident on that side. Regardless you have done a great job if fixing up this car to what it is now. I know you are documenting the build, but knowing the car is finished, would love to see a heap of photo's of the finished car. By the way what is the Red colour? I don't recognise it as a Ford colour, but it looks the goods. |
||
|
|
|
|
02-03-2012, 10:03 PM
|
#12 | ||||
|
74xbkoop
Join Date: Mar 2008
Posts: 204
|
And best of all
image image The bog in here was about 3/4 inch thick and this beautiful piece of workmanship was done by a profesional (qualified) repairer years ago and it also had been to another panel beater for respray and still not repaired properly!! I know there are worse cars on here rust wise etc but it peaved me off when I was advised that the car had issues and were all fixed profesionally. As the saying goes " You cant polish a **** but tou can paint it "[/quote] I have never seen that on a coupe. I would have also been Peeved off seeing that. Was it just the one side or both? Both may have been a roof change, but if just the one side, must have been in an accident on that side. Regardless you have done a great job if fixing up this car to what it is now. I know you are documenting the build, but knowing the car is finished, would love to see a heap of photo's of the finished car. By the way what is the Red colour? I don't recognise it as a Ford colour, but it looks the goods.[/QUOTE] Hi SCJCoupe, Thanks, The car was T Boned on the drivers side. Further details will be posted in the next few days.The colour is not ford it translates to Blood red. Here is a couple of finished shots.   Quote:
 P.s Love your coupe. |
||||
|
|
|
|
08-03-2012, 10:35 PM
|
#13 | ||
|
74xbkoop
Join Date: Mar 2008
Posts: 204
|
Back to the story.
I had a bit of time off from the car while I built a shed and finally brought the baby home and decided it was time to get serious about it. After making several phone calls I found out a bit more of the history of the car. The car had been T boned on the drivers side in the 80's and had the rear quarter "profesionally" replaced by a panel repair shop. The owner then was not happy with it and sold it. The next owner had it for about 12 years, started to rebuild it and had it resprayed again. It then sat in his shed for a number of years untouched. Then I managed to aquire it. I still think he got depressed with the job when things didnt fit and lost interest. Now that I could realy get stuck into the car, I put it up on stands and made it level. Measured all diagonals I could find to check the correctness of the chassis. The overall diagonal was within 2mm. Close inspection didnt show any issues with floor pan or chassis. So the stripdown began. Sorry I dont have many photos of this part I have spent the last 5 days trying to find them but they have vanished. Not happy at all, Bloody computers! I cut the rear quater off with a Dremel Multi tool. It was held on with spot welds, mig, oxy, soft solder and braize. I think he was practicing his various welds. What a mess. The car looked bald.   Once the quater was off all sorts of nasties showed up showing part of the reason for the poor fit. Burnt off metal, Parts of the old quater still there Parts bent etc etc      
|
||
|
|
|
|
08-03-2012, 10:45 PM
|
#14 | ||
|
74xbkoop
Join Date: Mar 2008
Posts: 204
|
The wheel tub had to come off then the "boot side panel"
  Removed the doors  
|
||
|
|
|
|
09-03-2012, 01:34 PM
|
#15 | ||
|
FF.Com.Au Hardcore

Join Date: Sep 2005
Location: Brisbane, Sunny QLD
Posts: 2,377
|
I'd have been scared to remove the whole quarter panels. It's an amazing story so far and what a result at the end! well done.
__________________
|
||
|
|
|
|
09-03-2012, 06:00 PM
|
#16 | ||
|
PURSUIT 250
 
Join Date: Mar 2009
Location: sydney
Posts: 5,743
|
ah man, so let down right now. looking forward to seeing more
|
||
|
|
|
|
11-03-2012, 09:58 PM
|
#17 | ||
|
74xbkoop
Join Date: Mar 2008
Posts: 204
|
Hi Lilmattie,
I didn't want to cut the guard off myself, but after numerous promices from Friends to help but not showing. I decided to bit the bullet and get the guard off. One hell of a learning curve but Im glad I did it. I have learnt heaps as I had to learn everything myself and went to night Tech and got Cert 2 in welding. This helped heaps and I would recomend it to anyone trying to do a rebuild. Thanks for the coment. |
||
|
|
|
|
11-03-2012, 10:01 PM
|
#18 | ||
|
74xbkoop
Join Date: Mar 2008
Posts: 204
|
Hi Giant Cranuim,
Dont be sad the story has a great ending! More photos to come soon. Was going to post some tonight but something going on with photobucket and my computer. Hopefully be able to sort it out the next couple of days. |
||
|
|
|
|
26-04-2012, 09:16 PM
|
#19 | ||
|
74xbkoop
Join Date: Mar 2008
Posts: 204
|
Sorry for the delay in posting more photos. Been flat out fixing up my sons XB GS pano for rego and busy at work. But back to the story now.
The next thing was to cut the sils off. Fully remove all signs of rust, Clean and prime with weld through primer. I also fitted a chassis support rails to the frame inside the sil.  Sorry I dont have more photos. One of my computers has died and have lost a heap of photos. Peaved off as I took shots of everything I did at each stage and now gone! Bloody computers! Ordered replacement sils from a mob in Melbourne and upon arrival found they were a totally different shape. Tried to send them back and basically told bad luck you get what you get. ( Great service) I phoned Grand Tourer and the guys there could not be more helpful. I explained the problem and sent them down a sample of the origonal sil section. They personally went to the guy who bends them up and picked out 2, the exact shape I needed. These guys are fantastic to deal with and would recomend them to anyone.Cut them to shape ready for fitting and coat the inside as well. Fit them up and weld them on.      
|
||
|
|
|
|
26-04-2012, 11:09 PM
|
#20 | ||
|
FF.Com.Au Hardcore
Join Date: Jan 2009
Location: Country SA
Posts: 722
|
Really enjoying following this build, keep it coming.
Your car definately deserved the best XB trophy at the Hardtop Anniversary last year; well done. Hope I can get mine close to the standard you have set. Cheers Glen |
||
|
|
|
|
26-04-2012, 11:59 PM
|
#21 | ||
|
My toy

Join Date: Nov 2008
Location: South Ozz on the only leg Australia has to stand on
Posts: 580
|
Top job.
If your looking for a holiday by the sea, your welcome any time. Ill supply the welder and tools  The finished product is a credit to you  Cheers Kerry |
||
|
|
|
|
27-04-2012, 03:03 PM
|
#22 | ||
|
FF.Com.Au Hardcore
Join Date: Sep 2007
Location: New Zealand
Posts: 1,649
|
Really interested in following this - mine looks just the same - no rear drivers quarter LoL
*bites nails* Here's mine ... 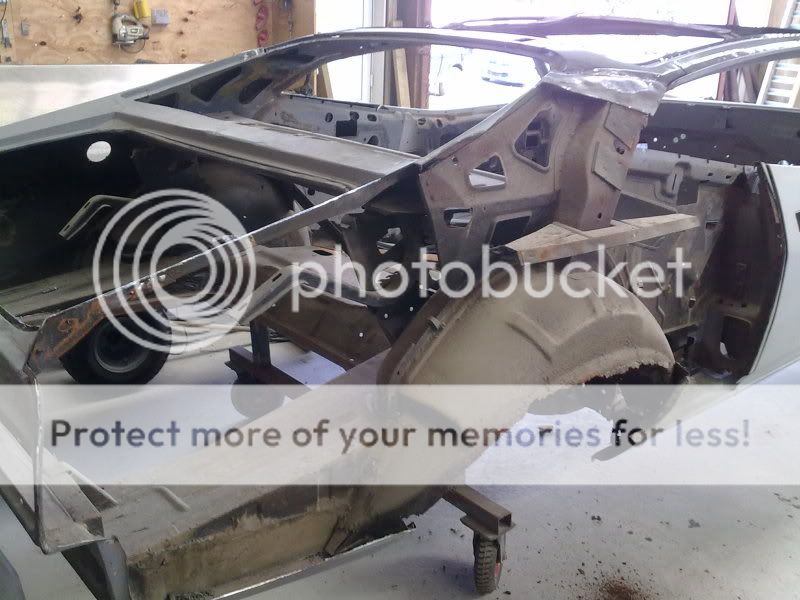
__________________
He who dies with the most toys wins!! "Target acquired .... target engaged ..... TARGET ANGRY!!!" |
||
|
|
|
|
02-05-2012, 11:05 AM
|
#23 | ||
|
74xbkoop
Join Date: Mar 2008
Posts: 204
|
Hi Guys,
Thanks for the comments, Glen Don't sell yourself short on your coupe, its bloody nice and I'm enjoying reading your build . Kerry I would love to come over for a holiday but the missus would be P!@@$4 , You know what I mean. XBCoupeNZ That looks familiar you seem to be missing the roof though? Isn't it amazing how with these things you end up opening up a can of worms. Hopefully I can recover my missing photos as there is a lot of the quarter going back on. I see your wheel tub is rotted as well? You have a lot of work ahead of you. Good luck with getting it back together. I would be interested in seeing more as you progress. I Just took my time and had to redo a few thing a couple of times before I was satisfied with the fitment and I'm happy with the results. It makes it all worth while when you get to the end when you have done it all yourself even though it seems to take an eternity. Should be able to get more posted the next couple of nights. , You know what I mean. XBCoupeNZ That looks familiar you seem to be missing the roof though? Isn't it amazing how with these things you end up opening up a can of worms. Hopefully I can recover my missing photos as there is a lot of the quarter going back on. I see your wheel tub is rotted as well? You have a lot of work ahead of you. Good luck with getting it back together. I would be interested in seeing more as you progress. I Just took my time and had to redo a few thing a couple of times before I was satisfied with the fitment and I'm happy with the results. It makes it all worth while when you get to the end when you have done it all yourself even though it seems to take an eternity. Should be able to get more posted the next couple of nights.See Ya |
||
|
|
|
|
02-05-2012, 11:25 AM
|
#24 | |||
|
FF.Com.Au Hardcore
Join Date: Sep 2007
Location: New Zealand
Posts: 1,649
|
Quote:
The roof is being replaced witha NOS skin - the original roof had a crappy 80's sunroof in it.
__________________
He who dies with the most toys wins!! "Target acquired .... target engaged ..... TARGET ANGRY!!!" |
|||
|
|
|
| This user likes this post: |
|
20-05-2012, 11:10 PM
|
#25 | ||
|
74xbkoop
Join Date: Mar 2008
Posts: 204
|
Been busy at work lately. Had my fix today and got some shots of the coupe done.
    Back to the build soon, Im tyring to recover lost photos. |
||
|
|
|
|
20-05-2012, 11:15 PM
|
#26 | ||
|
moderator ford coupe club
Join Date: Jun 2007
Posts: 6,640
|
looking great anthony
|
||
|
|
|
|
20-05-2012, 11:26 PM
|
#27 | ||
|
74xbkoop
Join Date: Mar 2008
Posts: 204
|
Thanks Gary
|
||
|
|
|
|
21-05-2012, 12:01 AM
|
#28 | ||
|
Legend!!!

Join Date: Jun 2007
Posts: 907
|
That colour is amazing.
It suits the coupe perfectly.
__________________
BARE BONES RACING BACK TO THE BONE YARD |
||
|
|
|
|
21-05-2012, 12:20 AM
|
#29 | ||
|
Moderator Ford Coupe Club

Join Date: Dec 2004
Location: Vic
Posts: 3,905
|
Hi Anthony. Looks great, amazing job!! Hope to see it in the flesh one day soon!!
__________________
Mitsubishi ASX Auto, White - Daily Commuter XC Fairmont Coupe, 351 4spd, Graphite Grey - The Antidote http://www.fordcoupeclub.org "If you don't know where you're going, any road will take you there" George Harrison 2001. |
||
|
|
|
|
21-05-2012, 06:12 PM
|
#30 | ||
|
FF.Com.Au Hardcore

Join Date: Aug 2006
Location: ipswich
Posts: 522
|
very nice job ,the colour changes abit on my screen is it a metalic paint or just red like vixen ...doc
|
||
|
|
|


 Linear Mode
